Different Types of Stitches Every Fashion Brand Should Know (Before Your Next Production Run)
Picture this. Your first bulk order just landed from the factory. You rip open the box, pull out a hoodie, and something feels… off. The seams pucker. The hem looks wavy. Three months of planning, and the finishing makes it look like a knockoff of your own design.
Here’s the hard truth: most fashion founders lose money not because their designs are bad, but because they never learned to talk about stitches. And in garment production, the stitch is the language.
If you can name the right stitch for the right job, factories take you seriously, samples come back closer to perfect, and your tech pack stops looking like a guess. Let’s fix that today.
Why Stitches Matter More Than Most Founders Think
New brand owners spend hours picking fabric, color, and prints. Stitching gets an afterthought glance. That’s backwards.
The stitch type decides how a garment moves, how long it survives washing, and how “expensive” it feels in someone’s hands. A $15 t-shirt and a $60 t-shirt can use the exact same cotton — the difference is often in the seams.
Think of stitching as the skeleton of a garment. The fabric is the skin, the print is the makeup, but the stitch is what holds everything upright when someone actually wears and washes the thing.
For global brand founders working with overseas factories — whether in Bangladesh, Vietnam, Turkey, Portugal, or China — stitch terminology is also a shared language. Say “5-thread overlock” instead of “the seam should look neat,” and your factory instantly knows what machine, what thread count, and what finish you expect.
The Basic Building Blocks: Stitch Classes You’ll Actually Use
Before diving into specific stitches, let’s get one thing straight in plain English.
A stitch type is simply the pattern a sewing machine’s needle and thread create to join fabric. Different machines make different stitch patterns, and each pattern behaves differently under stress, stretch, and washing.
The global apparel industry follows a numbering system called ASTM stitch classes (100 to 600). You don’t need to memorize all of them, but knowing the main families will instantly upgrade how you brief a factory or a tech pack designer.
Here are the ones that show up in almost every clothing category:
Different Types of Stitches Every Fashion Brand Should Know
1. Lockstitch (Class 300)
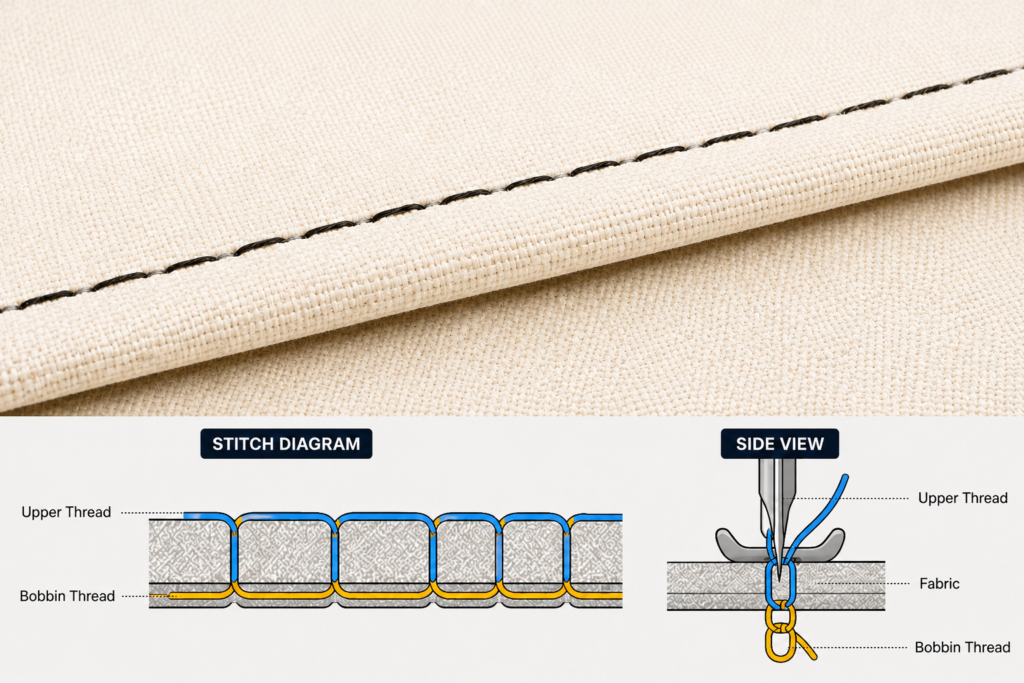
This is the classic straight stitch you see on most woven shirts, trousers, and jackets.
- How it works: Two threads — one from the top (needle) and one from the bobbin underneath — lock together inside the fabric.
- Why it’s used: It’s strong, clean-looking, and doesn’t unravel easily from one end.
- Where you’ll see it: Shirt button plackets, trouser waistbands, denim topstitching.
- The catch: Lockstitch has almost zero stretch. Use it on stretch fabrics like rib knits, and the thread snaps the moment someone bends or sits down. This is one of the most common mistakes new POD (print-on-demand) and knitwear founders make.
Practical tip: If your product is a woven shirt, dress pants, or a structured jacket, lockstitch is usually your friend. If it’s activewear, leggings, or anything with 2-way or 4-way stretch, avoid lockstitch on stress points like underarms or crotch seams.
2. Chainstitch (Class 100)
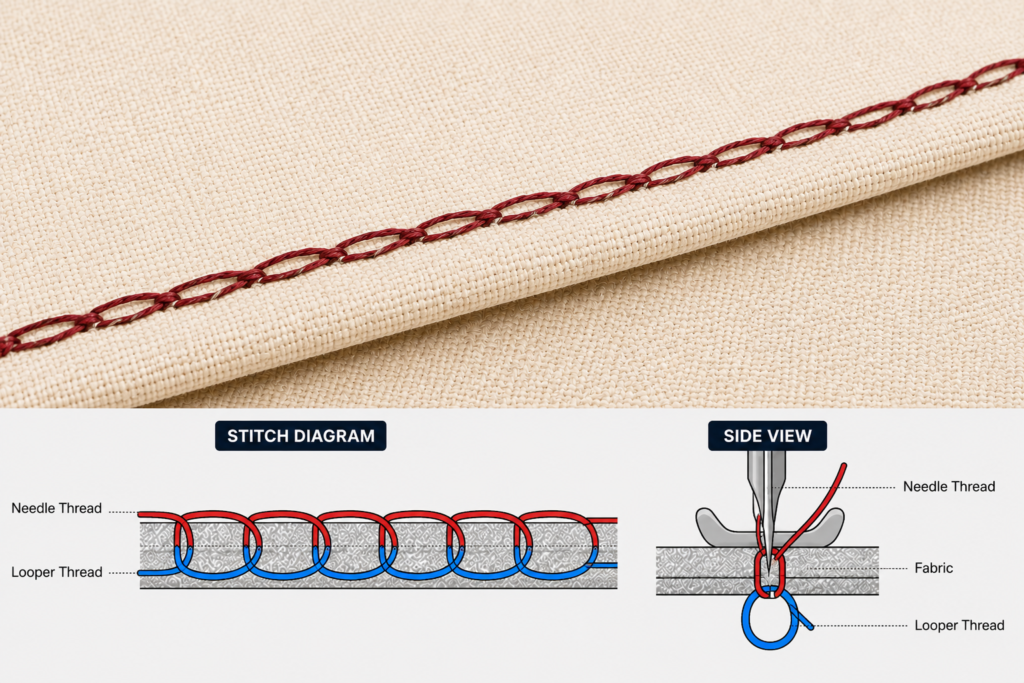
Chainstitch looks like a series of interlocking loops, a bit like a tiny chain — hence the name.
- How it works: Uses only one or two threads that loop into each other, without a bobbin thread locking it from underneath.
- Why it’s used: Slightly more elastic than lockstitch, and very fast to sew, which keeps production costs down.
- Where you’ll see it: Denim jeans (often on the inseam), sacks, and some basic tees.
- The catch: Pull one end of a chainstitch thread and the whole seam can unravel like a shoelace. This is why you’ll often see chainstitch reinforced with a lockstitch or bar tack at the ends.
Real-world example: Ever pulled a loose thread on your jeans and watched half the hem come undone in seconds? That’s chainstitch unraveling. Good factories always secure the stitch ends to prevent this.
3. Overlock / Serge Stitch (Class 500)
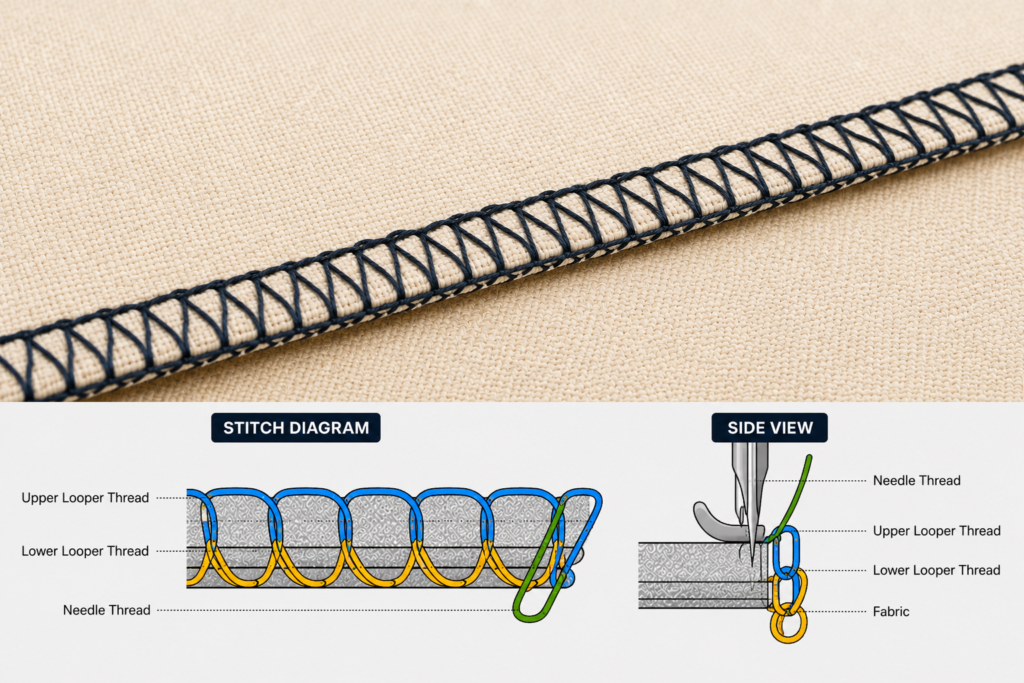
If lockstitch is the “structure” stitch, overlock is the “finishing and stretch” stitch — and it’s probably the most important one for anyone making t-shirts, hoodies, or activewear.
- How it works: Multiple threads (3, 4, or 5) wrap around the raw fabric edge while stitching it together, trimming excess fabric at the same time.
- Why it’s used: Prevents fraying, adds stretch, and gives a clean factory finish.
- Where you’ll see it: Side seams and shoulder seams on almost every t-shirt, hoodie, and knit dress on the market.
Beginner breakdown:
- 3-thread overlock: Mainly used to finish raw edges (like the inside hem of a t-shirt) so it doesn’t fray.
- 4-thread overlock: Adds a safety stitch for extra strength — common on side seams that take stress when you move.
- 5-thread overlock: Combines a safety stitch with an overlock, often used for higher-quality knitwear and activewear brands that want durability.
Practical tip: If your factory quotes you a price without specifying overlock thread count, ask. A 3-thread finish is cheaper but weaker; a 5-thread finish costs a little more but survives gym sessions, washing machines, and years of wear.
4. Coverstitch (Class 400)
This is the stitch responsible for that clean, parallel double or triple line you see on t-shirt hems and neckbands.
- How it works: Creates two or three parallel rows of stitching on top, with a looped thread underneath, allowing the seam to stretch without breaking.
- Why it’s used: Gives a professional, ready-to-wear look while allowing stretch — essential for knitwear.
- Where you’ll see it: T-shirt bottom hems, sleeve hems, neckbands on hoodies and sweatshirts.
Real-world example: That neat double-line stitch on the bottom of your favorite hoodie? That’s a coverstitch machine at work. Brands that skip this and use a plain straight stitch on knit hems often see the hem pop or crack after a few washes.
5. Flatlock Stitch
A cousin of the coverstitch family, but the fabric edges sit flat against each other instead of folding over.
- How it works: Creates a completely flat seam with visible ladder or v-shaped stitching on the surface.
- Why it’s used: Extremely popular in activewear and athleisure because it eliminates seam bulk that could rub against skin during movement.
- Where you’ll see it: Sports bras, leggings, cycling jerseys, and seamless-look activewear.
Practical tip: If you’re building an activewear or gymwear brand, flatlock seams are a strong selling point you can highlight in your marketing — customers genuinely notice the difference in chafe-free comfort.
Specialty Stitches Every Brand Founder Should Recognize
Beyond the core stitch classes, there are specific stitch techniques used for particular jobs. Knowing these will make your tech packs far more precise.
Topstitching
A visible line of stitching on the outside of the garment, usually parallel to a seam or edge.
- Purpose: Adds strength and a decorative detail.
- Common use: Denim pockets, collar edges, cuffs.
- Founder tip: Topstitching thread color is a branding opportunity. Contrast stitching (like orange thread on blue denim) has become a signature look for many premium denim labels.
Blind Hem Stitch
A stitch that’s nearly invisible from the outside of the garment.
- Purpose: Used when you want a clean hem with no visible stitching line, common on tailored trousers, skirts, and dresses.
- Founder tip: If your product photos show a trouser hem with zero visible stitching, that’s a blind hem — and it usually signals a higher price point to customers.
Bar Tack
A small, dense zig-zag reinforcement stitch, not a seam by itself but a reinforcement point.
- Purpose: Used at stress points like belt loops, pocket corners, and fly openings to prevent tearing.
- Founder tip: Always specify bar tacks on belt loops and pocket openings in your tech pack — factories sometimes skip this to save thread cost unless you ask for it explicitly.
Zigzag Stitch
A stitch that moves side to side instead of straight, giving it built-in stretch.
- Purpose: Used for stretch seams, appliqué attachment, and some finishing edges on knitwear.
- Founder tip: Great budget-friendly stretch stitch for small-batch or POD brands that don’t have access to overlock machines yet.
French Seam
Not a stitch type by itself, but a seam construction method using two passes of straight stitching to fully enclose raw edges inside the seam.
- Purpose: Used on lightweight and sheer fabrics (like silk or chiffon) where raw, frayed edges would show through the fabric.
- Founder tip: If you’re designing a premium blouse or dress line in delicate fabric, ask your factory for French seams — it instantly elevates perceived quality.
How to Choose the Right Stitch for Your Product
Here’s a simple decision framework you can actually use, whether you’re a solo POD creator or running a growing apparel label.
Step 1: Know your fabric type.
- Woven fabric (shirts, trousers, jackets) → lockstitch for structure, French seam for delicate fabrics.
- Knit fabric (t-shirts, hoodies, joggers) → overlock for side seams, coverstitch for hems.
- Stretch/performance fabric (leggings, sportswear) → flatlock and zigzag stitches.
Step 2: Identify stress points. Ask yourself where the garment gets pulled, stretched, or rubbed the most — armpits, crotch seams, pocket corners, belt loops. These areas need reinforcement like bar tacks or extra-thread overlock.
Step 3: Match stitch to price point. A 3-thread overlock finish and a plain hem will always look and feel cheaper than a 5-thread overlock with a clean coverstitch hem. If you’re positioning your brand as premium, your stitch choices need to match that story.
Step 4: Put it in writing. Don’t leave stitch decisions to “factory standard.” Specify stitch type, thread count, and stitches-per-inch (SPI) in your tech pack. A higher SPI (like 8–10 for wovens) usually signals a stronger, tighter seam.
Common Mistakes Fashion Founders Make With Stitching
- Assuming all factories default to good stitching. Many will use the cheapest stitch class unless you specify otherwise — it directly affects their cost per unit.
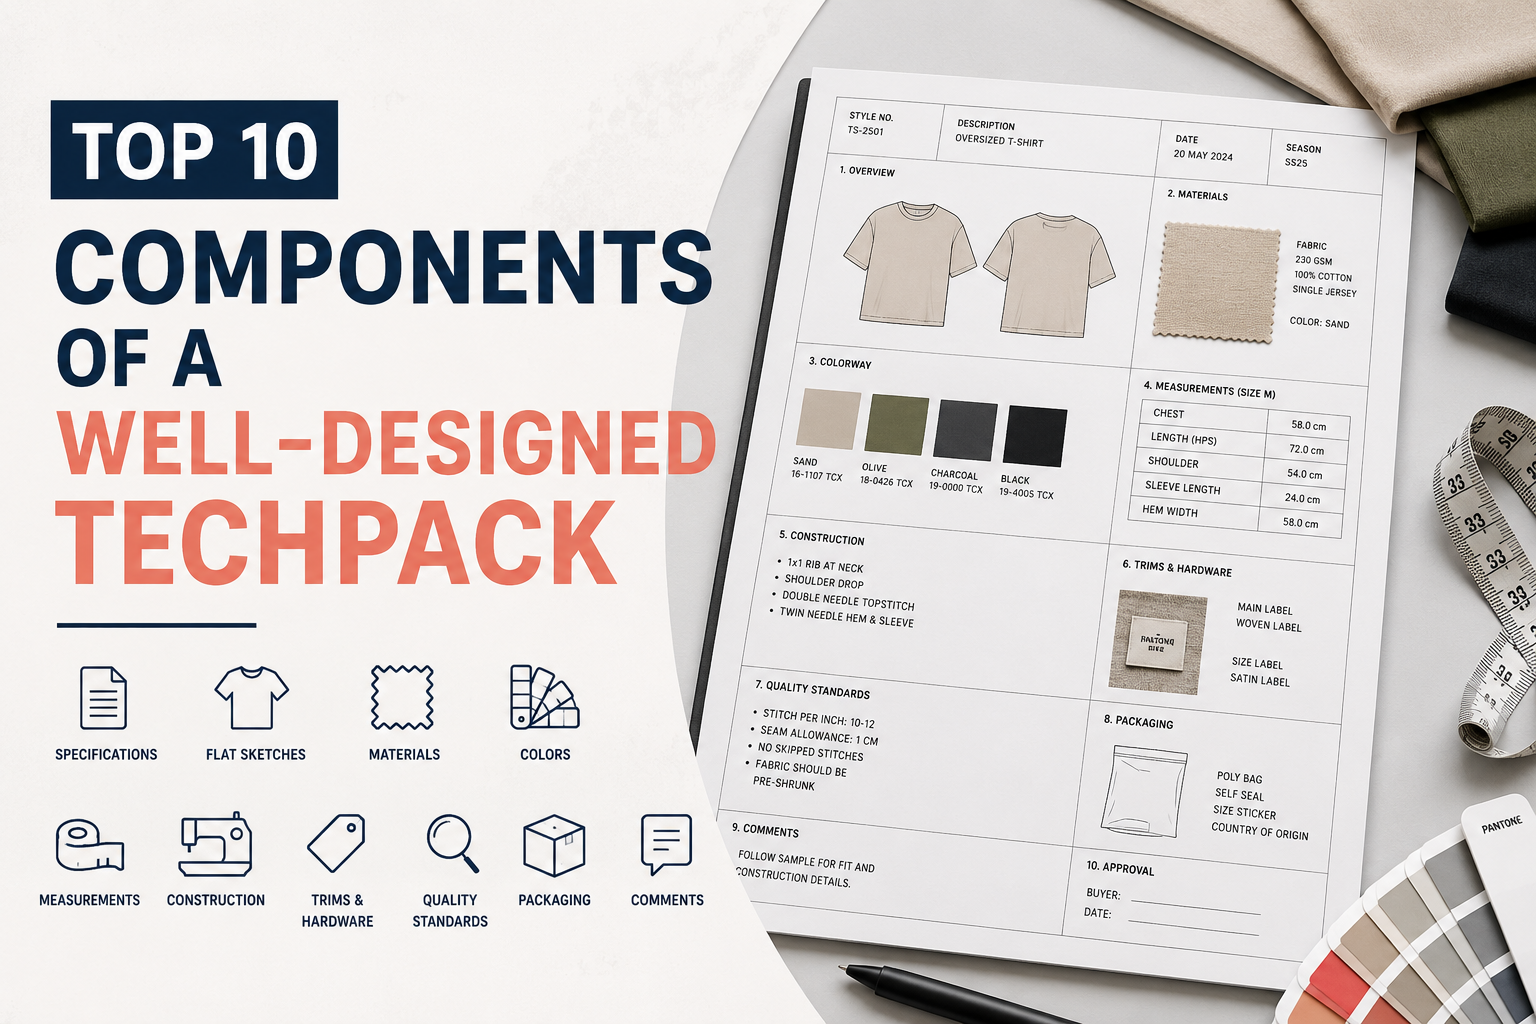
- Ignoring stitch details in the tech pack. A tech pack that only shows measurements and colors, without seam and stitch callouts, leaves too much open to interpretation.
- Choosing style over durability. A flat, minimal stitch might look sleek in a sketch but fail under real-world stretch and washing.
- Not asking for a stitch sample before bulk production. Always request a pre-production sample so you can physically test seams by pulling, stretching, and washing before committing to hundreds of units.
- Overlooking thread quality. Even the right stitch type fails if the factory uses low-grade polyester thread that snaps under tension. Ask about thread brand and tensile strength for high-stress garments.
A Quick Story From the Factory Floor
A small activewear founder once sent leggings into bulk production without specifying seam type. The factory used a standard lockstitch side seam to save cost. Within two washes, customers reported seams splitting at the knee during squats.
The fix cost the founder a full reprint — thousands of dollars — and a wave of refund requests. One line in the tech pack (“flatlock stitch, 4-thread, side and inseam”) would have prevented the entire disaster.
This is exactly why stitch specification isn’t a “nice to have” detail. It’s a business-saving detail.
Final Thoughts: Stitching Is Where Design Meets Durability
Your logo gets people to notice your brand. Your stitching is what makes them trust it enough to buy again.
The next time you’re briefing a factory, working on a sample, or building your tech pack, don’t just think about how the garment looks — think about how it will move, stretch, and survive in someone’s daily life.
Learn these stitch types, use the right terminology, and put them in writing. It’s one of the simplest, cheapest ways to protect your brand’s reputation before a single unit ships.
If you’re not confident writing stitch specifications into your own tech pack yet, that’s exactly the kind of detail a professional tech pack service can lock down for you — so your factory has zero excuses to guess.
FAQs: Stitch Types for Fashion Brands
1. What is the strongest stitch type for clothing? Lockstitch is considered the strongest for woven, non-stretch fabrics because it locks tightly and resists pulling apart. For stretch fabrics, a 5-thread overlock offers the best mix of strength and flexibility.
2. What stitch is best for t-shirts? Most t-shirts use overlock stitching (3 or 4-thread) on side and shoulder seams, with coverstitch on the hem and neckband for a clean, stretchy finish.
3. Why do my seams keep unraveling? This usually happens with chainstitch seams that aren’t properly secured at the ends, or with low-quality thread. Ask your factory to bar tack or lockstitch the ends for extra security.
4. What’s the difference between overlock and coverstitch? Overlock finishes raw edges and joins fabric while trimming excess material, mainly used on side seams. Coverstitch creates parallel stitching lines on the surface, mainly used for hems and neckbands. Many knit garments use both.
5. Do I need to mention stitch type in my tech pack? Yes. Without it, factories default to whatever is cheapest or fastest for them, which may not match your quality expectations. Always specify stitch class, thread count, and SPI (stitches per inch).
6. What stitch is best for activewear and leggings? Flatlock stitching is the industry standard for activewear because it lies flat against the skin and reduces chafing during movement.
7. Can print-on-demand (POD) brands control stitch quality? To some extent, yes. Most POD platforms use standard blanks, but you can choose suppliers known for better overlock and coverstitch finishing, and request samples before scaling up bulk orders.
Want your next tech pack to include every stitch, seam, and finishing detail spelled out clearly for your factory? That’s exactly what we do at TechPackGenius — factory-ready tech packs, built fast, with unlimited revisions.
Table of Contents